The new blog/shop is up and running, hopefully I've ironed most of the problems out of it so now it should be running smoothly.
This web site is built using the Drupal content management system at its base. This flexible system lets me build a database holding all the information I want to display on the website then control just how that information is displayed. So, to use the blog/shop as an example. I fill in one form with information for the blog and I can use that one set of information to display the showcase on the front page, the workshop notes and recent highlights on the fornt page, the shop grid and each individual blog post page. All of these are just different ways of displaying the same information. It's fantastically powerful and lets me make changes and add things to the site quickly and easily.
As I've put together the structure of the website I've moved more and more of it to the core of the workshop notes blog. Each blog post is based on a single database record and each record is divided into fields, each containing a separate piece of information. Drupal lets me add new fields as I need them so the blog entry page is now quite comprehensive. These are the fields each blog entry contains.
Title: The title of the blog post
Product Name : If the blog entry contains a project to download, this is its name. The product name is used in the shop grid page.
Product: A tick box to say whether the blog entry contains a product.
Download: A tick box for if the blog entry has a download associated with it. Not all products are downloads, the Caffeine T-shirt for example.
Repost: Tick box, is the blog entry a repost? If I am re-posting an old project I don't want it o appear in the shop twice.
Free: Tick box, is the product free?
Members Only: Tick box, if its free, is it available to everyone or just members.
Show Case: Last of the tick boxes. Is the project to be displayed in the show case on the front page.
Image 200: A 200×200 pixel image that s shown at various sizes as the thumbnail picture at the beginning of the blog post.
Image 300: A 300×300 pixel image that is used in the show case display on the front page.
Taxonomy: The tags associated with the blog post, useful for grouping related posts together.
Teaser: The short text used in the show case.
Body: The main body of the blog post with all the pictures and text.
Price: Project price if it is in the shop
AddToCart: The main Add To Cart link
ATCFree: The free Add To Cart link for members
Publishing info: Information about authoring, date of publication, whether the post is published and who can see it.
There are various other fields which control comments, spam protection and other such bits an pieces.
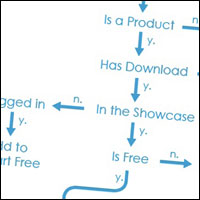
It has become surprising complicated! I've actually removed a few fields that I no longer use. In the just over a year that the site has been on line this structure has changed a lot, I now think that it is about where I want it. I have loads of control over how blog posts are displayed. I can use all this information and display it as I want it. As a final example, in the main workshop notes blog posts some posts need an Add To Cart link, some need a free link and others have nothing. I used the php programming language to control how each link is displayed. the flow chart below show how the decision as to what is displayed is made.
My apologies for digressing from the paper engineering but as people who like making things I hope that you might be interested in how the back end of this website is made.


